Whether you’re building a DIY racing drone, an aerial photography platform, or a custom UAV for industrial applications, PID tuning is the single most important skill for getting stable, responsive flight. At Aomway, we’ve seen countless developers struggle with oscillation, drift, and sluggish controls — all because of poorly tuned PID parameters.
Recently, the drone development community has embraced open-source flight controllers like PX4, APM, and INAV. But here’s the catch: default PID parameters almost never deliver optimal performance out of the box. They’re either too conservative (making your drone feel sluggish) or unstable when you push the limits.
This Aomway guide distills the official PX4 and APM tuning documentation into practical, actionable steps. No fluff — just what you need to make your quadcopter fly like it’s on rails.
📋 Official References:
1. Understanding PID Parameters — The Foundation of Stable Flight
Before touching any sliders, you need to understand what each gain actually does. PID controllers are used in everything from industrial robots to spacecraft — and mastering them for drones gives you skills applicable far beyond the hobby.
1.1 Proportional Gain (P) — Response Speed
P gain reduces tracking error by applying a correction proportional to the error magnitude. Set it as high as possible without inducing oscillation.
| Symptom | P Gain | Effect |
|---|---|---|
| 🔴 High-frequency buzzing | Too High | Drone shakes uncontrollably, motors run hot |
| 🟡 Sluggish stick response | Too Low | Drone feels “drunk” — drifts in Acro mode, slow corrections |
1.2 Derivative Gain (D) — Overshoot Damping
D gain acts like a shock absorber — it predicts future error trends and applies braking force to prevent overshoot. Higher D means smoother stops, but too much amplifies sensor noise.
- Too High: Motors sound “gritty,” run hot, gyro noise becomes visible in FPV feed
- Too Low: Noticeable bounce-back after sharp stick inputs, altitude overshoot in punch-outs
1.3 Integral Gain (I) — Steady-State Precision
I gain accumulates error over time to eliminate persistent offsets. Without it, your drone won’t hold angle in wind or during aggressive maneuvers.
- Too High: Slow, rhythmic oscillation (0.5-2 Hz) — looks like a gentle wobble
- Too Low: In Acro mode, a 45° pitch slowly returns to level — the drone “forgets” your command
1.4 ⚠️ Critical Safety Rules (Read Before Flying)
🛑 LAND FIRST, ADJUST SECOND. Never modify PID gains while airborne.
📏 20-30% increments only. Once optimal values are found, reduce by 5-10% as a safety margin.
🏞️ Open field, no people. First test flights after tuning must be in clear, unoccupied areas.
2. The Rate-First Tuning Philosophy
PX4 and APM use a layered control architecture that you must respect:
- Rate Controller (Inner Loop): Controls roll, pitch, yaw angular velocity — this is your foundation
- Attitude Controller (Outer Loop): Controls body angles, outputs target rates to the inner loop
- Velocity & Position Controllers: Higher-level navigation — don’t touch these until steps 1-2 are solid
Golden Rule: Inner loop first, outer loop second. If your rate controller isn’t locked in, no amount of attitude tuning will save you. Aomway’s testing methodology always starts here.
2.1 Flight Mode Selection
- Acro Mode: Best for rate controller tuning — isolates the inner loop without attitude interference
- Stabilize / AltHold: Use for attitude-level tuning once rates are solid
- Position Mode + Simple Position Control: For velocity/position tuning (final step)
3. Step-by-Step Tuning Procedure
3.1 Pre-Flight Setup
Symmetric airframes (most X-frames): Tune roll and pitch simultaneously.
Asymmetric frames (H-frames, custom builds): Tune each axis independently.
If oscillation already exists on an axis: reduce P, D, I by 50% first, then begin tuning from the stable state.
3.2 The Tuning Sequence
- D first: Increase D by 50% until oscillation appears, then decrease by 10% steps until clean, then reduce by another 25% for margin
- P next: Increase P by 50% until oscillation, then back off by 10% steps, then reduce by 25%
- I last: Set I equal to your final P value as a starting point, then fine-tune
- After each P change: Re-match I to P for pitch and roll axes
All parameter changes should be made on the ground with motors disarmed. Experienced pilots may use transmitter tuning knobs for real-time adjustments, but this requires significant skill.
4. Using QGroundControl for Visual Tuning
QGroundControl (QGC) displays real-time command vs. response curves, turning PID tuning from guesswork into data-driven engineering. Your goal: make the actual response curve track the target curve as closely as possible — fast rise time, zero overshoot, zero oscillation.
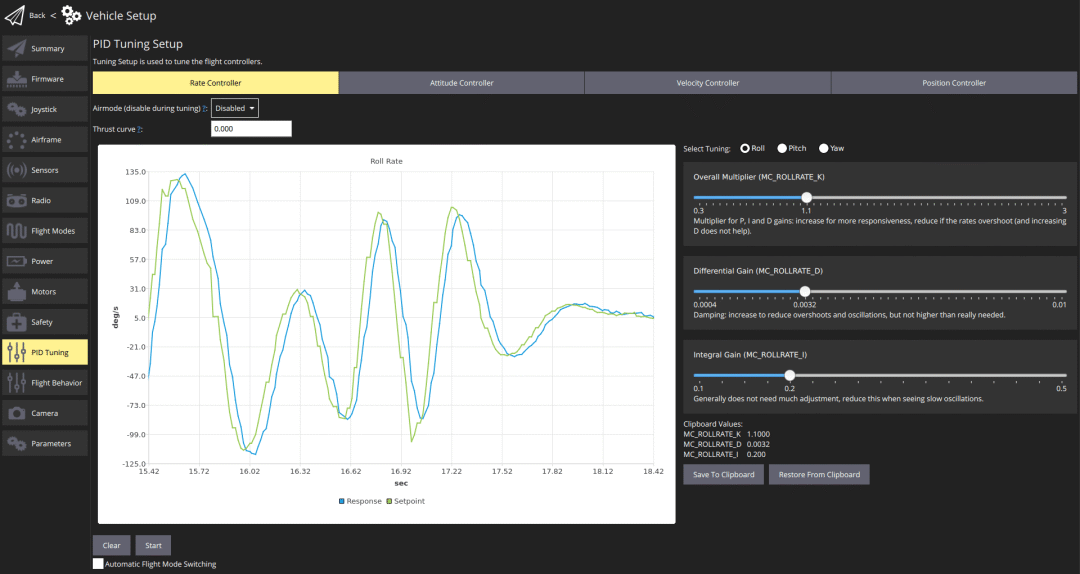
Figure 1: QGC Rate Controller Tuning UI — The blue curve shows commanded rate, red shows actual response
The rate controller is your highest-priority tuning target. Once it’s dialed in, attitude and position controllers typically need only minor adjustments — if any at all.
4.1 Rate Controller Tuning in Practice

Step 1 — P Gain: Hover, then snap the roll/pitch stick and release. Increase MC_ROLLRATE_K and MC_PITCHRATE_K by 20% each iteration. Stop when you see the first hint of high-frequency buzz, then back off 10-20%.
Step 2 — D Gain: Reference values: 0.01 (4″ racer) to 0.04 (500mm class). Increase until motors sound gritty, then back off.
Step 3 — I Gain: Reference values: 1 (500mm) to 8 (4″ racer). Pitch I is typically 10-20% higher than roll I. Increase until slow oscillation appears, then back off.
5. Flight Log Analysis — The Scientific Approach
Your eyes can only see so much. Flight logs reveal the truth. After each tuning session, download the log and examine:
- Rate tracking: Desired vs. actual angular velocity should overlap nearly perfectly
- Overshoot: Step inputs should show minimal (<5%) overshoot
- Settling time: Response should converge within 50-100ms after a step input
- Motor output: All four motors should show balanced, smooth PWM curves — asymmetry indicates a tuning or hardware issue
5.1 What a Good Tune Looks Like
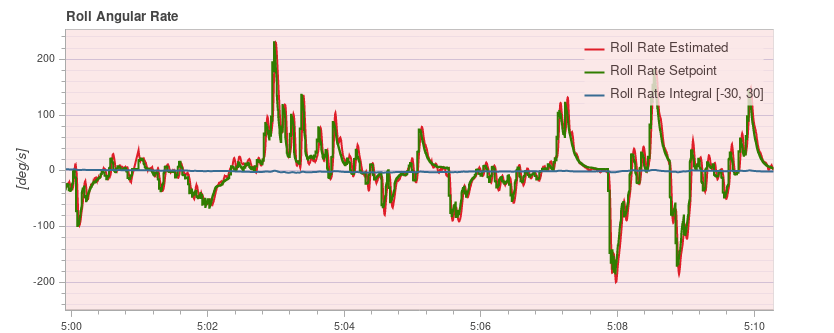
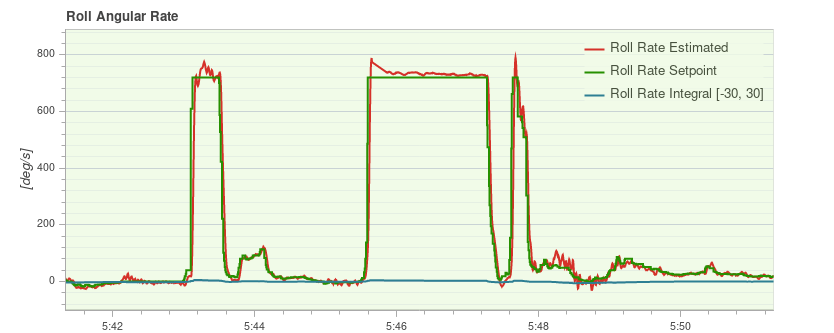
Figure 2: Well-tuned rate controller — actual response (red) tracks desired (blue) with minimal error
6. Quick Reference & Troubleshooting
The Tuning Mnemonic
“Inner before outer, D before P before I. Small steps each time. Oscillation means back it off.”
Common Problems & Solutions
| Symptom | Root Cause | Fix |
|---|---|---|
| High-frequency jitter (100+ Hz) | Rate P or D too high | Reduce P by 10%, then D by 10% |
| Slow wobble (0.5-2 Hz) | Rate I too high | Reduce I by 20% |
| Position mode drift | Rate loop untuned first | Return to rate tuning, then adjust attitude P |
| Hot motors after tuning | D gain too aggressive | Reduce D by 10-20%, check for mechanical vibration |
| Propwash oscillation | I gain too low + P/D imbalance | Increase I, re-check D, consider TPA (Throttle PID Attenuation) |
7. Beyond Basic Tuning — Going Further with Aomway
PID tuning is foundational, but it’s only the beginning. Once your quadcopter flies like it’s reading your mind, the real development journey begins. Stay tuned to Aomway for upcoming deep-dives into:
- PX4 custom module development
- ROS2 integration with PX4 flight controllers
- Autonomous obstacle avoidance algorithms
- Multi-drone swarm control and coordination
- Computer vision-based precision landing

Frequently Asked Questions — Quadcopter PID Tuning
Q: What is PID tuning for quadcopters and why does it matter?
PID tuning adjusts the Proportional, Integral, and Derivative gains in a drone's flight controller to achieve stable, responsive flight. Without proper tuning, a quadcopter may oscillate, drift, or respond sluggishly to inputs. At Aomway, we emphasize that well-tuned PID parameters are the difference between a drone you fight and one that feels like an extension of your hands. Proper tuning also extends motor life and improves battery efficiency.
Q: Should I tune the rate controller or attitude controller first?
Always tune the inner rate controller loop first. The rate controller is the foundation of the entire flight control system — its parameters directly affect all higher-level loops. If the rate controller isn't stable, no amount of attitude tuning will fix the underlying oscillation. Follow the sequence: rate controller → attitude controller → velocity & position controller. Use Acro mode for rate tuning to isolate the inner loop.
Q: What percentage should I adjust PID gains by during quadcopter tuning?
Start with 50% increments when searching for the oscillation threshold, then fine-tune with 10% decrements once oscillation appears. After finding the stable point, reduce gains by an additional 25% as a safety margin. Never adjust more than 20-30% at a time on a single parameter, and always make changes while landed — never in-flight.
Q: How do flight logs help improve PID tuning accuracy?
Flight logs provide objective data that your eyes alone can't capture. After tuning, download the log and examine angular velocity curves — the desired and actual rates should overlap closely with minimal overshoot (<5%) and no sustained oscillation. Motor output curves should be balanced across all four motors. Tools like PlotJuggler or QGroundControl's built-in log viewer make this process scientific rather than guesswork-based. Aomway recommends always validating your tune with log analysis before considering it complete.
Q: What are the best flight modes for PID tuning a PX4 or APM drone?
Use Acro (Rate) mode for inner-loop rate controller tuning — it disables the attitude controller so you can evaluate rate response in isolation. For attitude-level tuning, switch to Stabilize or AltHold mode once the rate controller is locked in. For velocity and position tuning, use Position mode with Simple Position Control enabled.
Q: Can I tune PID parameters while the drone is flying?
No! All PID gain adjustments must be made after landing with motors disarmed. In-flight tuning is dangerous because unstable parameters can cause immediate loss of control. Experienced pilots may use transmitter tuning knobs for real-time trim adjustments, but this requires extensive experience and should only be attempted with a well-understood baseline tune already established.
Q: What's the difference between P, I, and D gains in simple terms?
Think of it like driving a car: P (Proportional) is how hard you press the gas pedal to reach a target speed — too much and you overshoot. D (Derivative) is like anticipating a stop sign and braking early — it prevents overshoot by damping rapid changes. I (Integral) is cruise control that eliminates steady error — like maintaining exact speed on a hill. Together, these three terms make your quadcopter fly smoothly and precisely.
Any questions pls contact: [email protected]