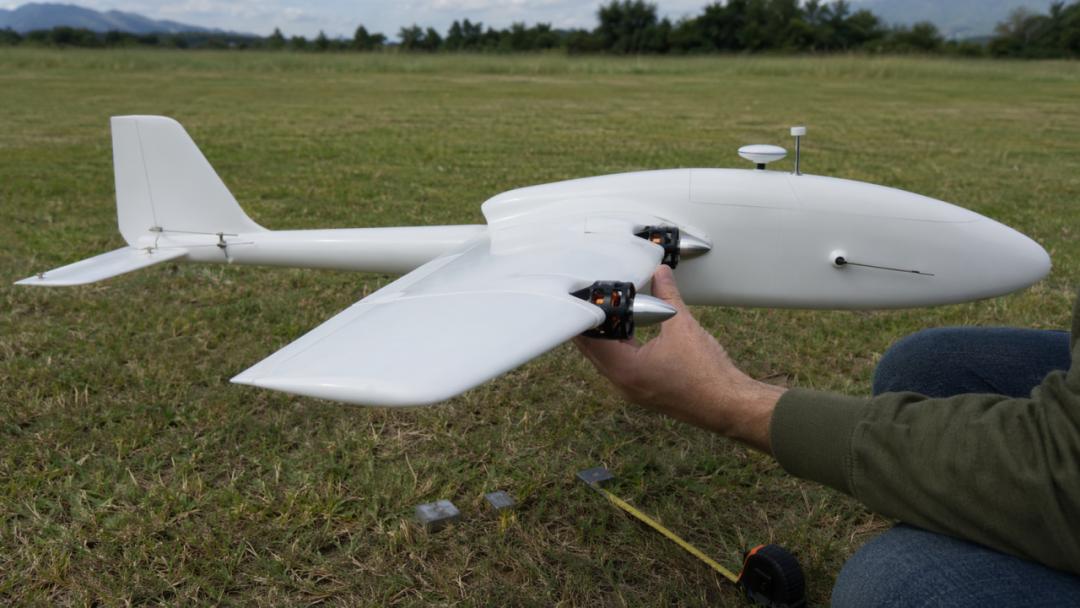
This article walks through the complete build journey of a 3D-printed Titan Comet fixed-wing UAV — one of the most cost-effective twin-motor 3D-printed airframes available, with a 1.45m wingspan and generous payload capacity. But 3D-printed airframes come with significantly more build challenges than traditional EPP foam models. For professionals at Aomway who prototype custom UAV airframes, these lessons apply equally to rapid prototyping workflows and production airframe development.
Here’s the timeline: 5 days of printing, 1 day of assembly, 2 days of tuning — and a first flight that ended nose-first in the ground after 3 seconds. After a week of repairs and adjustments, the aircraft has now logged 30+ stable flights. Every mistake is documented here to save you time.
Build Configuration

Here’s the complete component list and approximate costs:
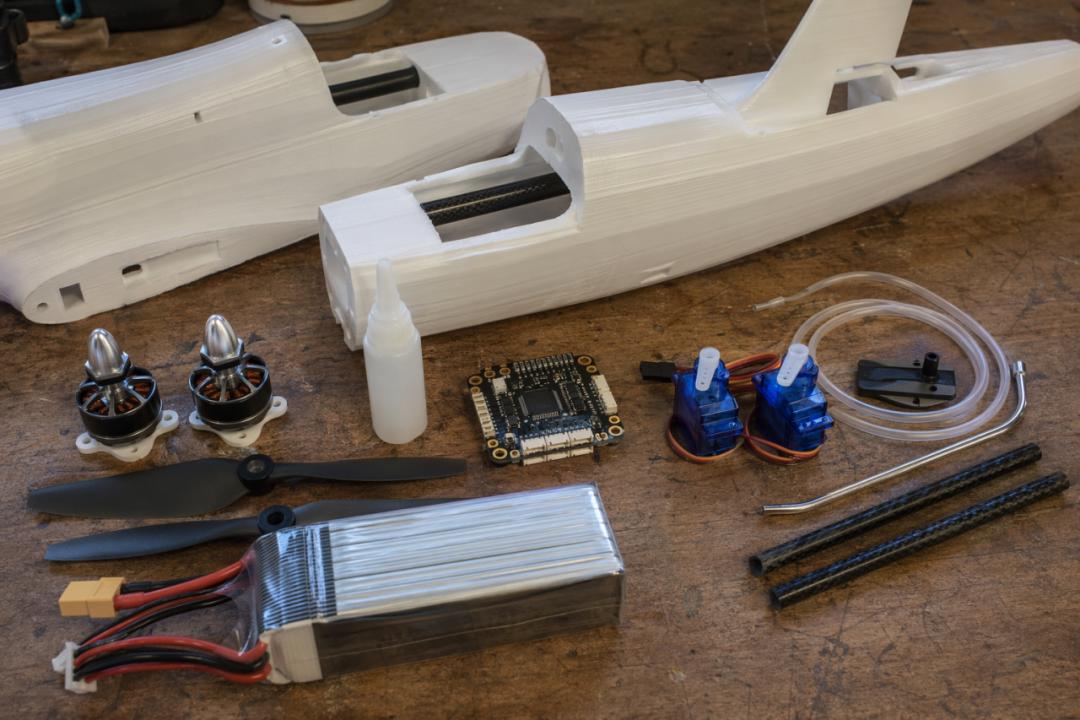
| Component | Model | Cost (USD) |
|---|---|---|
| 3D Printer | Bambu Lab A1 | Already owned |
| Filament | ABS natural white ×3 spools | ~$14 |
| Motors | 2812 1400KV ×2 | ~$17 |
| ESCs | Hobbywing Skywalker 30A ×2 | ~$20 |
| Propellers | 8045 3-blade CW+CCW | ~$3 |
| Flight Controller | Matek F405-WING | ~$23 |
| Servos | SG90 9g ×4 | ~$6 |
| Battery | 4S 3300mAh 30C | ~$17 |
| GPS | M10N | ~$7 |
| Radio | FS-i6X + IA6B | Already owned |
| Airspeed Sensor | MS4525DO | ~$9 |
Total electronics cost (excluding printer and radio): approximately $115. Material cost for the airframe: just $5 worth of filament — meaning crash repairs cost almost nothing.
Mistake 1: 3D Printing Failures Right Out of the Gate
The first attempt at printing with ABS filament failed dramatically. Printing the fuselage mid-section without an enclosure caused severe warping — 14 hours of printing wasted when the entire bottom surface curled up overnight.


The fix: switched to a hardened steel nozzle, raised nozzle temperature to 280°C, reduced print speed by 20%, and applied a layer of bed adhesive. The result was rock-solid. Only 3% infill is needed — that’s strong enough to withstand significant bending force. But a critical warning: never use PLA. A friend’s PLA Titan Comet softened and warped after just 40 minutes in summer sun.
Key print parameters: nozzle 280°C, 3% infill, ABS natural filament, small hole slow-down to 10% speed, hole compensation 0.2mm.
Mistake 2: Assembly is a Full-Body Workout
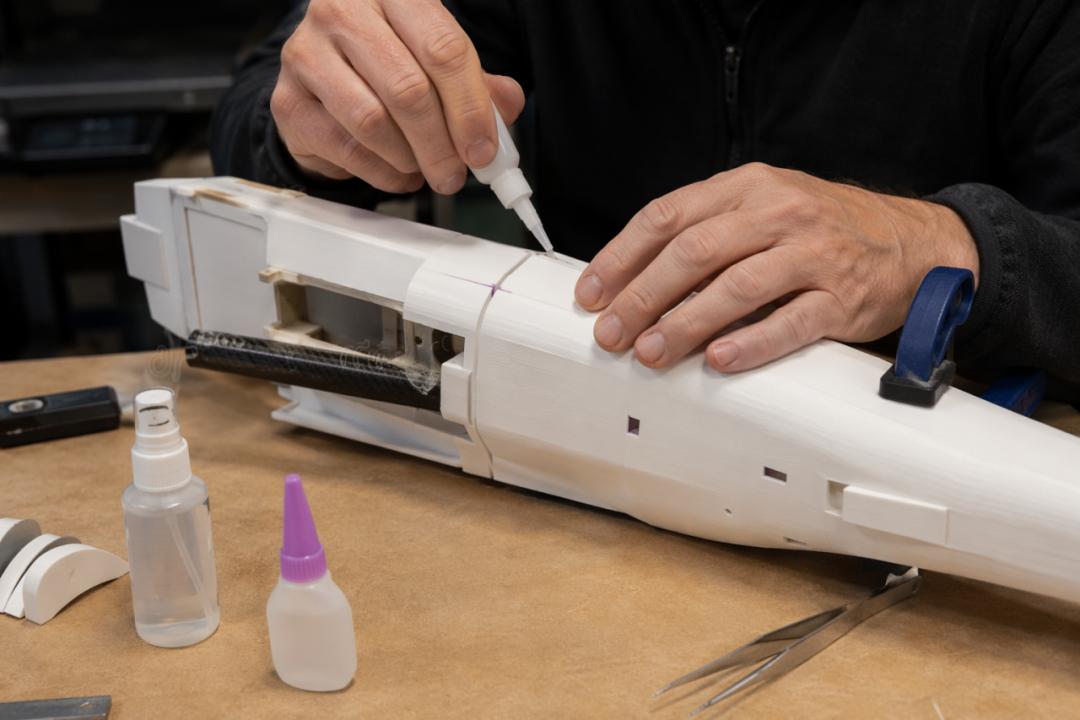
The Titan Comet consists of 43 printed fuselage segments, 6 segments per wing, 2 horizontal stabilizer segments, and 1 vertical stabilizer segment — all glued together with CA adhesive.


The technique: apply slow-cure CA to joining surfaces, align and press for 10 seconds, then spray activator for rapid curing. The 8×500mm carbon fiber main spar should be dry-fitted first to verify smooth insertion before applying glue — a practice Aomway’s assembly team applies to all composite airframe joints.
Hard lesson learned: Wing segment #3 was glued 2mm out of alignment, leaving a 3mm gap between the aileron and wing trailing edge — cutting aileron effectiveness in half. Disassembly and re-gluing cost another 2 hours. The new rule — shared by Aomway’s airframe quality inspection team: inspect every joint against backlight before applying glue; any visible gap means realignment is needed.
Mistake 3: Dual Motor Wiring is More Complex Than Expected
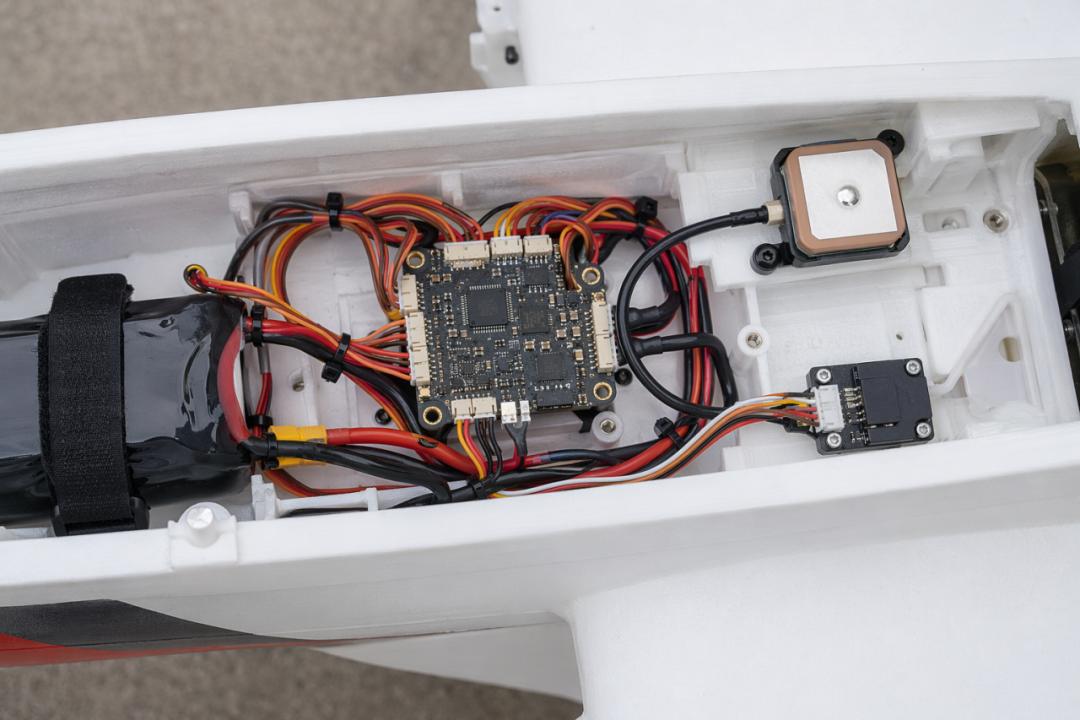
The Matek F405-WING channel mapping differs significantly from Pixhawk. Following a Pixhawk tutorial caused complete control surface chaos.


Correct wiring: MAIN OUT 1 = Aileron, 2 = Elevator, 3 = Throttle (left ESC), 4 = Rudder. The second ESC signal wire connects to MAIN OUT 5, with SERVO5_FUNCTION=74 (Differential Thrust Right Motor) configured in ArduPlane.
Critical detail: The two motors must counter-rotate — left motor CW, right motor CCW, with matched CW and CCW propellers. On the first attempt, both motors spun the same direction; the aircraft immediately yawed right after hand-launch, and crashed within 5 seconds — rudder input couldn’t compensate.
Pin orientation: signal wire (yellow/white) faces the board interior, ground (brown/black) faces outward. Reversed pins won’t cause damage but signals won’t reach the flight controller.
Mistake 4: CG Off by 5mm, 3-Second Nose-Dive


All-up weight came in at 2.3kg — 200g heavier than the recommended 2.1kg, with the excess weight concentrated in the tail (GPS mount, airspeed sensor module, two silicone tubes).
The finger-balance test immediately revealed a severe nose-heavy condition. The recommended CG at 55mm behind the wing leading edge was off — with CG shifted 5mm rearward.
5mm doesn’t sound like much, right? For 3D-printed airframes, CG tolerance is much tighter than EPP foam. EPP can handle ±10mm deviation and still fly; 3D-printed airframes can lose stability with just ±5mm shift. Aomway’s flight testing team confirms this principle applies to all rigid-structure UAVs — from 3D-printed prototypes to carbon-fiber production airframes — tolerance margins shrink as structural flexibility decreases.
The fix: shifted the 4S battery 3cm forward and added 15g of lead weight in the nose compartment. Re-tested — perfectly horizontal balance. First successful hand-launch resulted in stable climb-out.
Mistake 5: Pitot Tube Installed Backwards
The pitot tube (thin metal tube) opening must face forward. Installation had it angled roughly 15° downward. During Mission Planner calibration, the airspeed read 0.8m/s even though the aircraft was stationary.

Reinstalled with the tube opening level and facing forward, extending 5cm beyond the fuselage. Post-calibration reading: 0.1m/s — normal.
Self-test method: blow air into the tube opening; the ground station airspeed value should increase. No increase means it’s either reversed or blocked.
Flight Performance After All Fixes
- Cruise speed: 55-60 km/h at 60% throttle, remarkably stable
- Maximum speed: 110 km/h in full-throttle dive (but the 3D-printed airframe vibrates at this speed — don’t push it)
- Endurance: 18-22 minutes on 4S 3300mAh, wind-dependent
- Landing: harder than EPP — no elastic cushioning; heavy touchdowns will crack the structure
- Crash recovery: just re-print damaged segments — $5 in materials plus a few hours
Summary
The Titan Comet is ideal for builders with access to a 3D printer, the patience to glue 43 fuselage segments, and the willingness to spend time on CG tuning. For those seeking plug-and-play simplicity, an EPP Bixler X8 assembles in 10 minutes.
If you’re working on custom 3D-printed UAV airframes and need flight controller integration support, feel free to contact Aomway at [email protected].
FAQ
Q1: Is ABS or PLA better for 3D-printed UAV airframes?
A: ABS is mandatory for outdoor use. PLA softens at ~60°C — direct summer sunlight can reach that temperature on dark surfaces in under 40 minutes. Aomway’s materials guide recommends ABS or ASA exclusively for any flight-worthy 3D-printed components. PETG is acceptable for non-structural internal mounts.
Q2: Why do 3D-printed airframes have tighter CG tolerance than foam?
A: Foam airframes have inherent structural damping and flex that absorbs small aerodynamic imbalances. Rigid 3D-printed structures lack this compliance — CG errors translate directly into control surface trim requirements. At Aomway, the engineering team applies ±3mm CG tolerance for rigid-frame UAVs and ±8mm for flexible foam airframes.
Q3: How do I verify differential thrust is set up correctly?
A: In ArduPlane Mission Planner, go to SERVO OUTPUT screen, arm the motors, and apply rudder input. The motor on the rudder direction should spin up while the opposite motor spins down. If both spin the same direction, check propeller orientation — you likely have two CW or two CCW props installed.
Q4: What’s the minimum telemetry setup for maiden flight?
A: At minimum: GPS lock (HDOP < 2.0), verified airspeed sensor, battery voltage telemetry, and manual mode on a dedicated switch. Aomway's flight test checklist includes 14 pre-flight verification items — including motor direction confirmation, airspeed calibration, and failsafe testing — before any maiden hand-launch.
Q5: Can the Titan Comet carry a mapping camera?
A: With the payload bay capacity, a lightweight action camera or small mapping payload (under 200g) is feasible. However, the 3D-printed structure lacks the vibration isolation needed for professional photogrammetry. Aomway’s survey-grade industrial UAVs use dedicated vibration-dampened payload mounts with active stabilization for centimeter-level photogrammetry results.
Have questions about this article? Feel free to contact us at [email protected] — we’re happy to help!
