What Is Camera ISP Tuning?
Camera ISP tuning is the process of taking the raw data output from an image sensor and processing it through an ISP (Image Signal Processor) to produce images with accurate colors, low noise, and visually pleasing quality.
Simply put:
The sensor captures light; the ISP “fixes the photo.”
Without ISP tuning, the RAW image from a camera sensor typically exhibits color casts (reddish or greenish), heavy noise, washed-out contrast, blown highlights in backlit scenes, lost detail, and poor low-light performance.
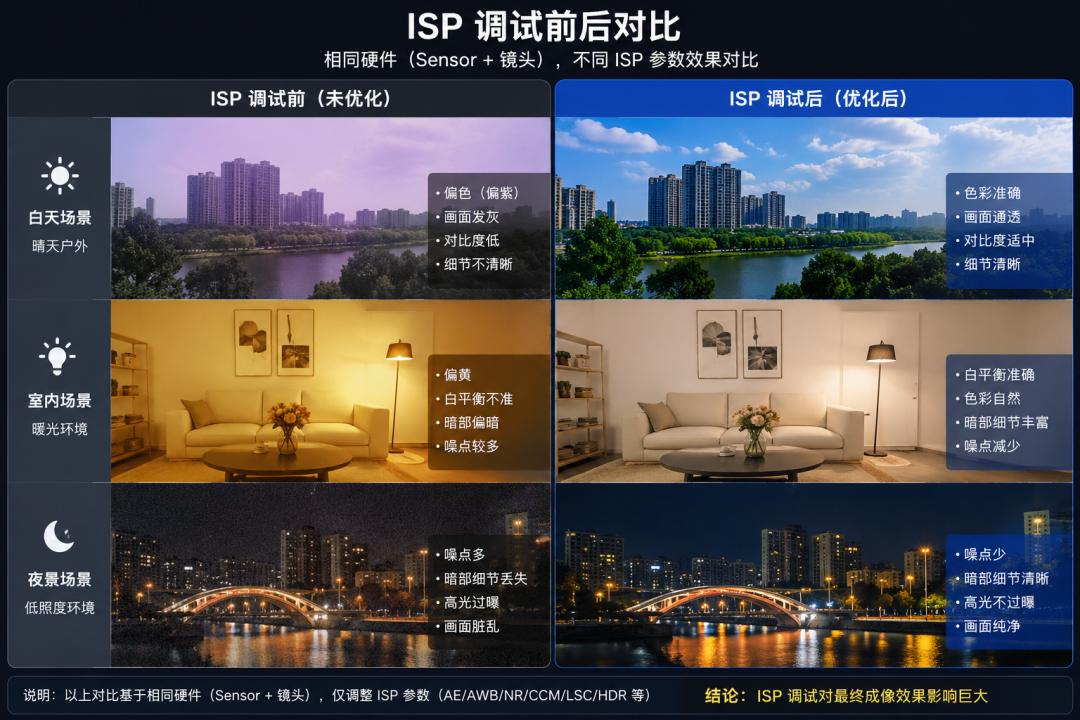
The same sensor can produce dramatically different results depending on the ISP tuning expertise of the manufacturer — final image quality can differ by several fold.
This guide is based on ISP tuning performed on the MYIR RK3576 development board, providing a practical reference for embedded vision developers. Aomway’s drone and robotics camera systems rely on the same ISP tuning principles to achieve production-grade image quality.

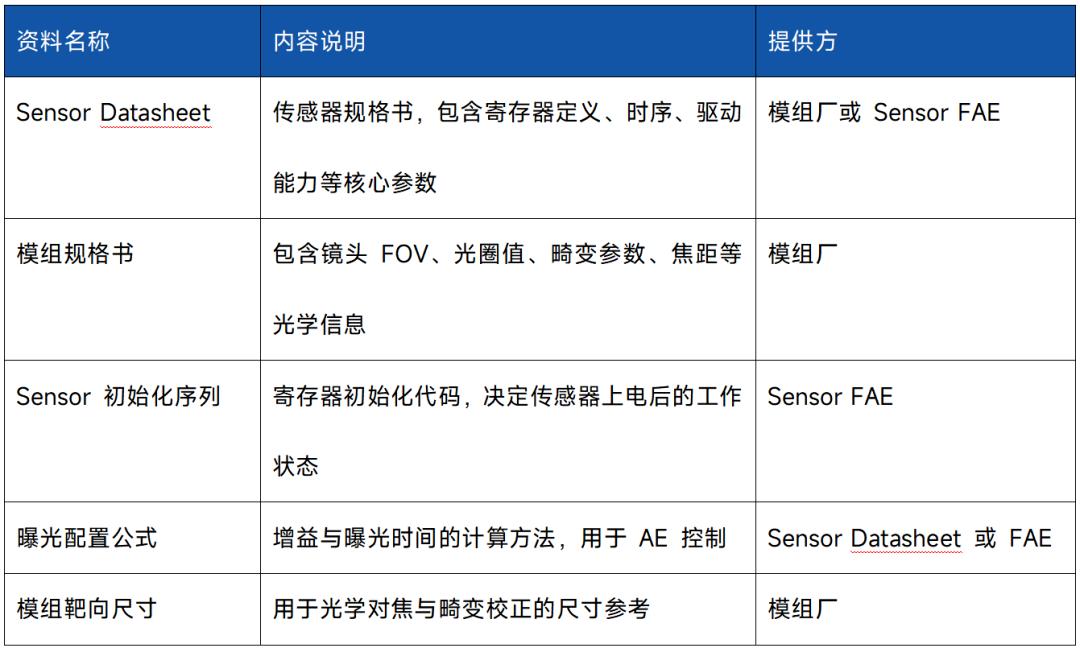
1. Pre-Tuning Preparation
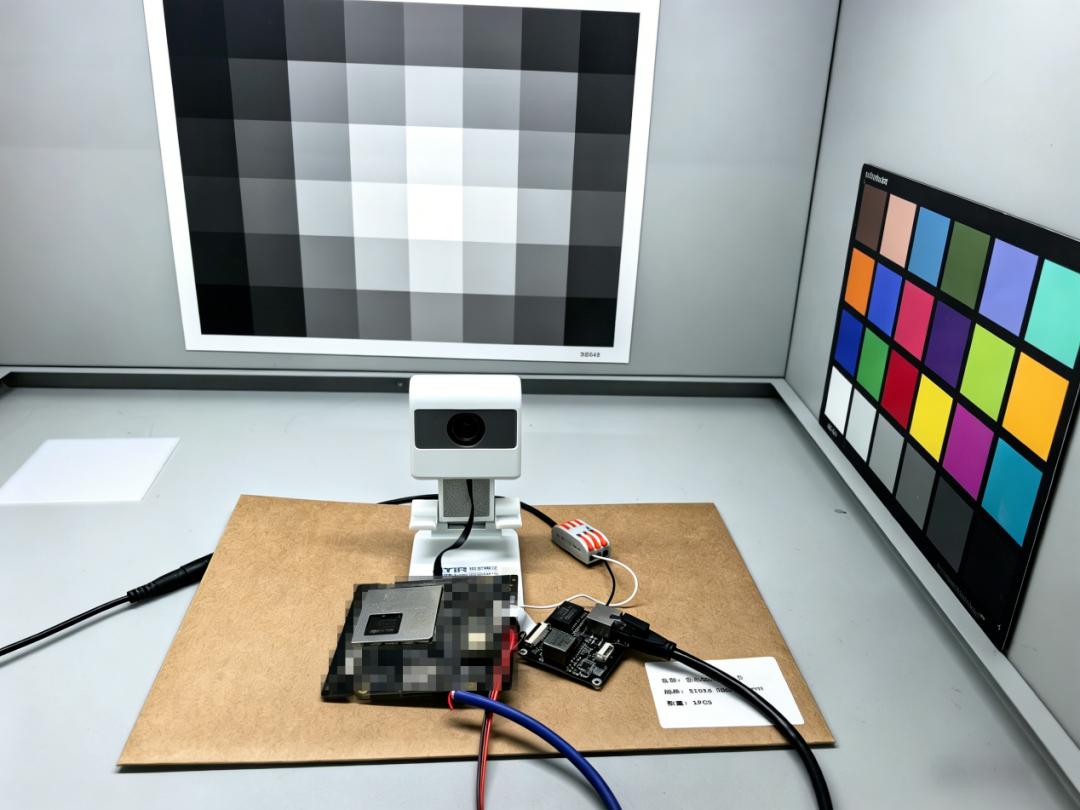
The first category is hardware: RK3576 dev board, MIPI camera module, standard light source box, diffuser panel, light-blocking cover, 24-color checker, grayscale card, and chessboard calibration target.
The second category is the on-board environment. This guide uses Buildroot Linux, running rkaiq_tool_server on the device. A successful connection prints:
Linux,Create domain socket success.
Found single camera node: /tmp/UNIX.domain0
Connect to /tmp/UNIX.domain0
rkaiq_tool_server connect AIQ success
lo IP: 127.0.0.1
eth0 IP: 192.168.1.173
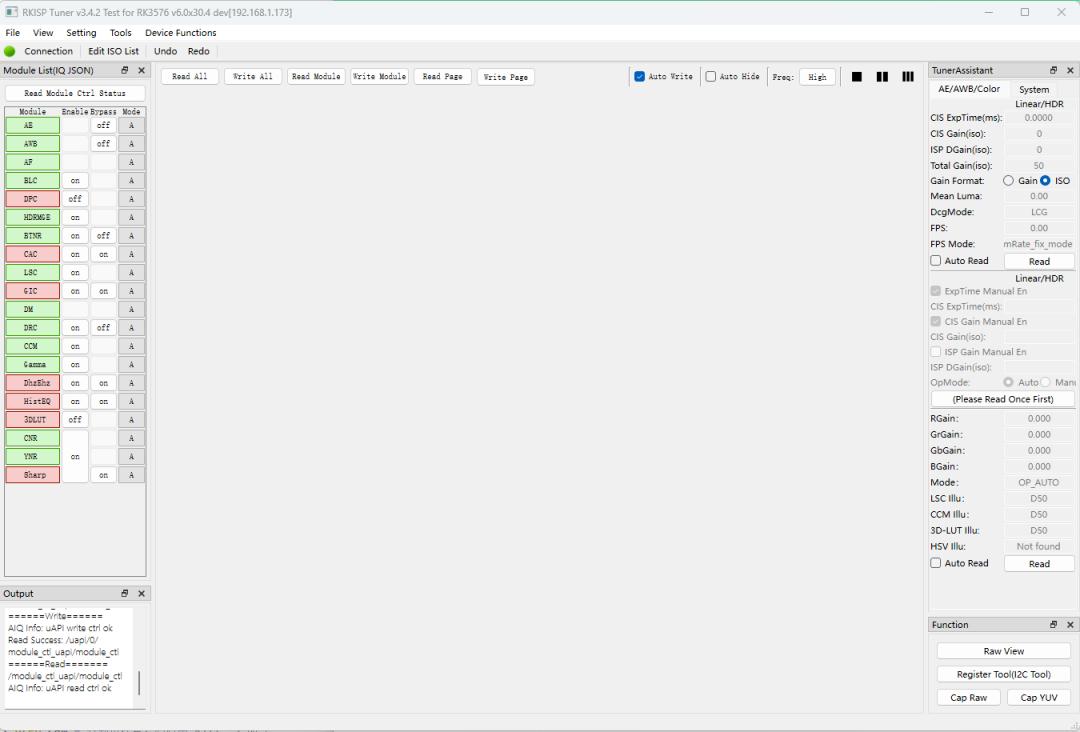
The third category is PC-side tools. On Windows, open RKISP Tuner, enter the board IP, and connect. Once connected, the left panel shows a live preview, and the right panel provides controls for each ISP module.
If connection fails, check three things first: rkaiq_tool_server is running, firewall allows the required ports, and the board IP is reachable from the PC.
2. Camera Calibration
The core principle of objective calibration is to follow the pipeline order. ISP modules have dependencies — earlier stage output affects later stage input. For example, if BLC is off, LSC, AWB, and CCM all operate on a corrupted baseline.
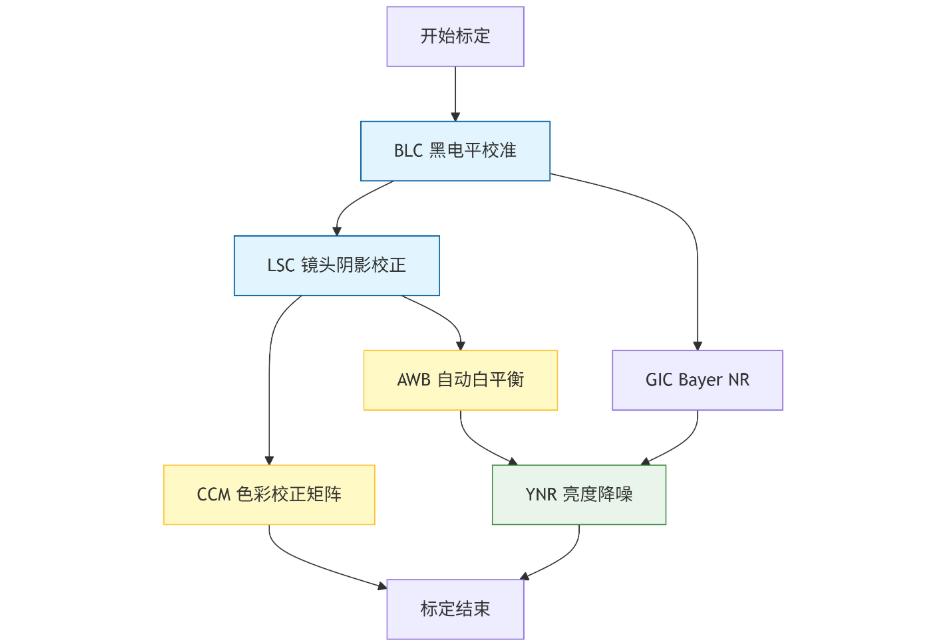
Recommended order:
BLC → LSC → AWB → CCM → Other modules
2.1 BLC (Black Level Correction)
BLC is the first step in the ISP pipeline, eliminating sensor dark current offset to establish the correct black level baseline for downstream modules.
During calibration, completely cover the lens to block all light, then capture RAW data in the BLC module of RKISP Tuner. Collect data at multiple gain levels (1x, 2x, 4x, 8x, 16x) to characterize black level offset across the gain range.
Empirical values: For 10-bit RAW, R/Gr/Gb/B channel black levels typically fall between 50–65, with inter-channel variance under 2. BLC deviation causes overall underexposure, reduced dynamic range, or colored noise in dark regions.
2.2 LSC (Lens Shading Correction)
LSC compensates for the brightness and color difference between lens center and edges. Calibration requires a uniform light environment — capture uniform-field images under D65, A, CWF, and TL84 standard light sources, then generate per-source Gain Tables.
Verification: After correction, Aomway’s QA team shoots a white wall or diffuser panel. Corner-to-center brightness difference should be within 5%.
2.3 AWB (Auto White Balance) Calibration
AWB restores white under varying color temperatures, preventing overall blue, yellow, or green casts. Capture a 24-color checker under HZ, A, CWF, TL84, D50, D65, and D75 light sources, compute R/G/B channel gains, and build WB Gain curves across color temperatures.
After calibration, white areas should satisfy R ≈ G ≈ B.
2.4 CCM (Color Correction Matrix)
CCM maps the sensor color space to standard sRGB via a 3×3 matrix. Always perform CCM after AWB is stable — an unstable white point corrupts the color matrix.
Target metrics at Aomway: average Delta E < 5, maximum Delta E < 10. In practice, the product positioning determines whether to preserve a slight style preference (more vivid, cooler, or neutral reproduction).
3. Subjective Tuning: From “Technically Correct” to “Visually Pleasing”
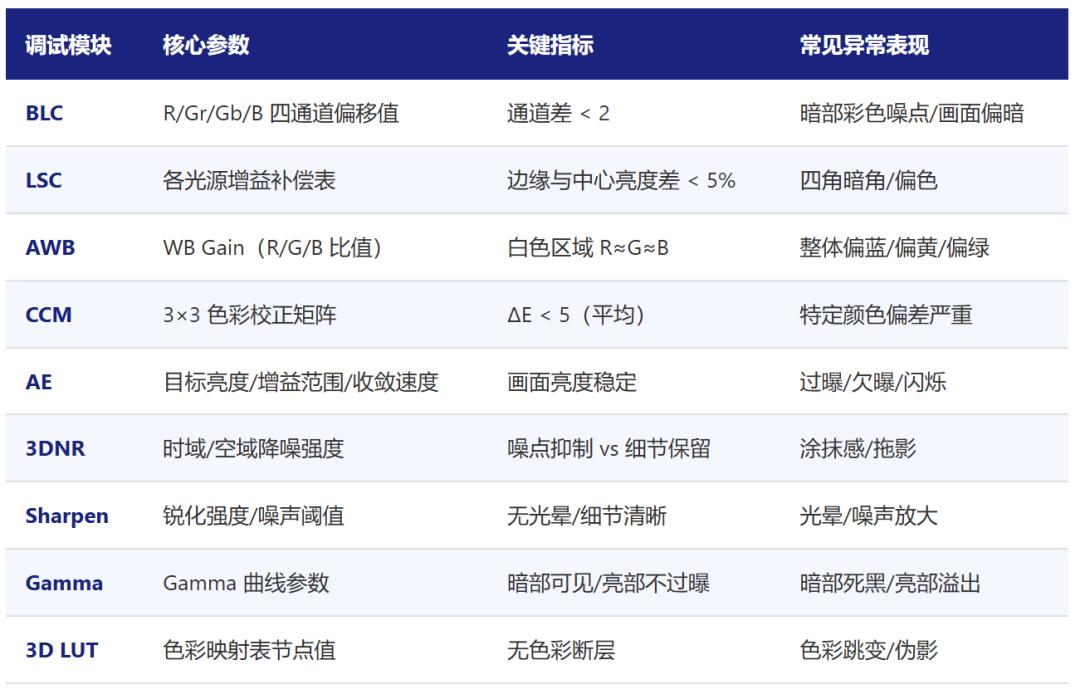
Objective calibration solves “is it accurate?” Subjective tuning solves “does it look good?” The MYIR RK3576 board features Rockchip’s ISP39, a third-generation ISP architecture supporting 3 MIPI inputs and 1 output, with a pipeline including BLC, DPC, Bayer-domain denoise, LSC, AWB, Demosaic, CCM, 3D LUT, Gamma, EE/Sharpen, and 3DNR modules.
 Subjective tuning workflow overview
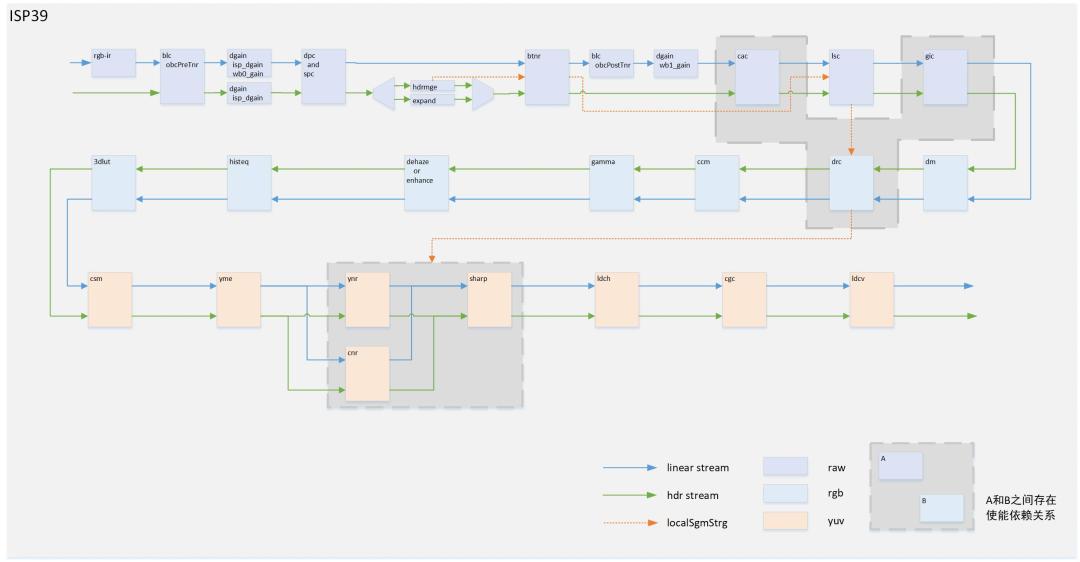
RK3576 ISP39 Pipeline architecture
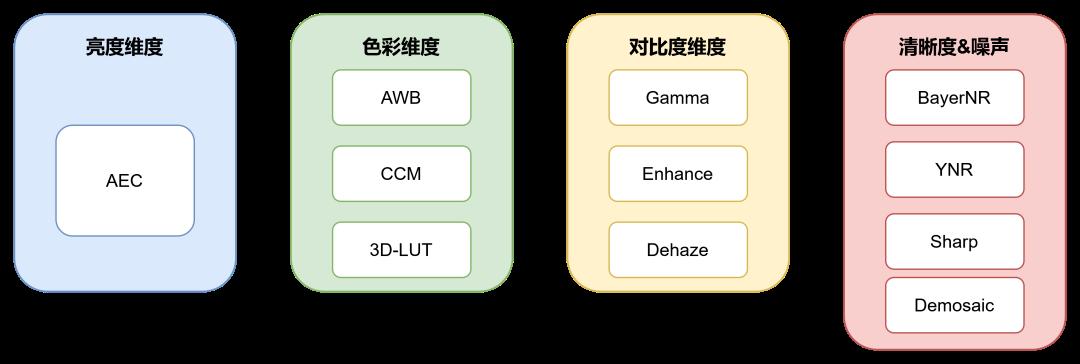
Subjective tuning covers four dimensions:
Brightness: AE controls overall exposure, stability, and dynamic range.
Color: AWB, CCM, and 3D LUT determine white balance, color accuracy, and creative style.
Contrast: Gamma, Enhance, and Dehaze control shadow, highlight, and local contrast.
Sharpness & Noise: BayerNR, YNR, Sharpen, Demosaic, and 3DNR balance detail against noise.
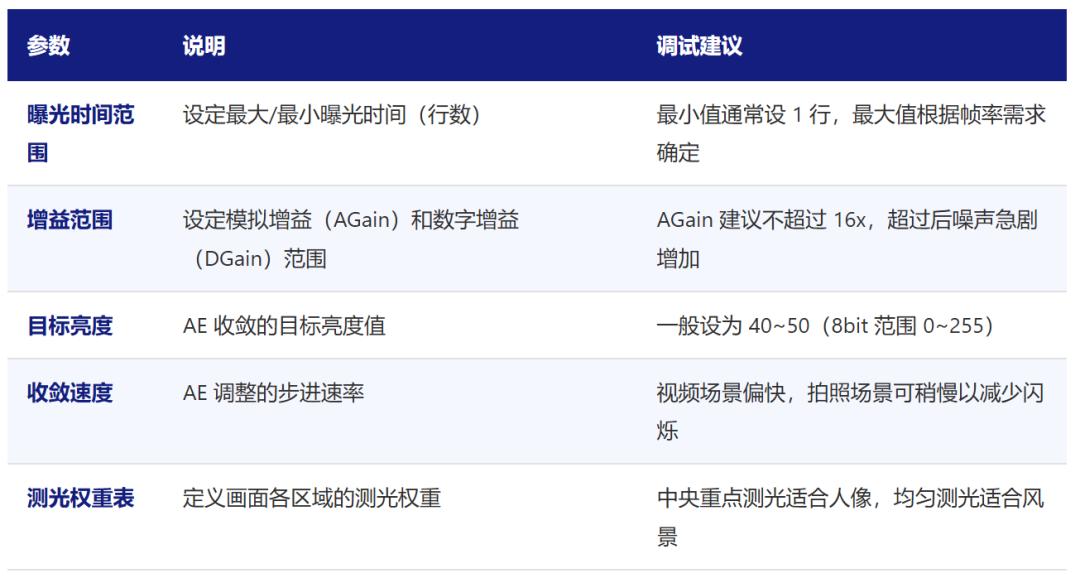
AE (Auto Exposure)
AE affects brightness, dynamic range, and exposure responsiveness. For Aomway’s aerial camera modules, AE stability directly impacts flight video quality. In indoor lighting, mind Anti-Flicker: at 50Hz, exposure time should be multiples of 10ms; at 60Hz, multiples of 8.33ms. Otherwise, flicker or horizontal banding appears.
3DNR (3D Noise Reduction)
3DNR combines temporal and spatial denoise — a critical tuning parameter for Aomway’s UAV camera systems where motion is constant. Static scenes benefit from higher temporal strength; motion scenes require lower strength to avoid ghosting. Motion detection threshold set too high retains ghosting; too low sacrifices denoise effectiveness.

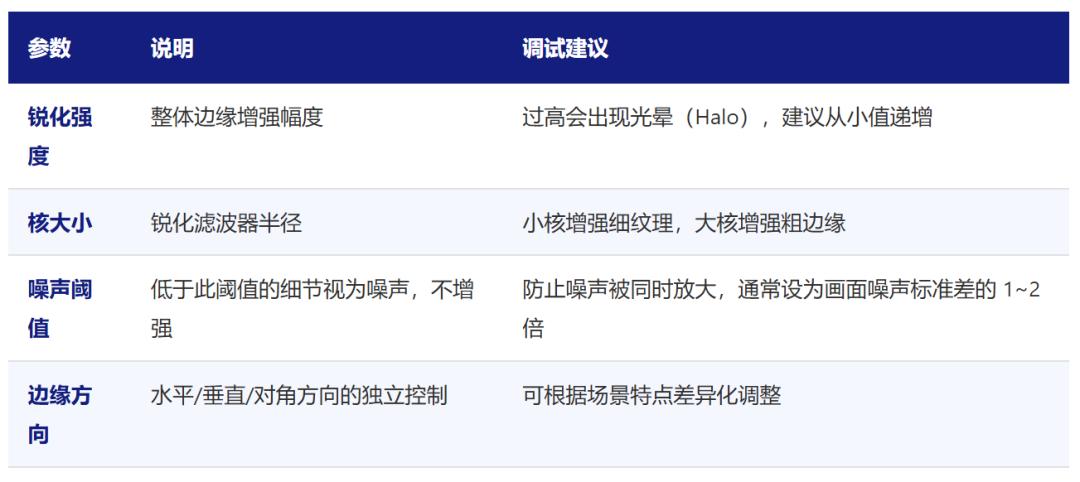
Sharpen
Sharpening compensates for detail loss from Demosaic and denoise. Aomway recommends starting from conservative sharpening values and increasing only after noise is under control. Verify on high-contrast edges (black/white text). White halos, bright rings, or amplified noise indicate over-sharpening — reduce strength or raise the noise threshold.
Gamma
Gamma maps the sensor’s linear light signal to a nonlinear output suited for displays and human perception. Standard sRGB uses Gamma 2.2. Raising shadow slope improves dark-region visibility; compressing highlight slope reduces blown highlights. Gamma affects AE target brightness — always re-verify AE after changing Gamma.
3D LUT
3D LUT provides fine-grained color style control beyond CCM coverage. Adjust after CCM is finalized. Keep adjustments subtle — excessive LUT shifts cause color banding or artifacts.
4. IQ Files: Tuned Parameters Must Be Deployable
The IQ file is the ISP parameter container, typically in JSON format, containing all module configurations (BLC, LSC, AWB, CCM, etc.). For RK3576, the IQ file is named /etc/iqfiles/ on the board.
Typical deployment flow:
# Push IQ file via ADB
adb push imx219.json /etc/iqfiles/
# Push via SCP
scp imx219.json [email protected]:/etc/iqfiles/
# Restart camera service
killall rkaiq_tool_server
# Or reboot the system
reboot
Common pitfall Aomway engineers frequently encounter: The IQ filename must match the rockchip,camera-module-name property in the device tree DTS, or the ISP won’t auto-load the correct parameters.
5. Common Issues Troubleshooting Table
The scariest situation in debugging is “image appears but looks wrong.” Don’t randomly tweak parameters — diagnose by module.
Preview all black/green/garbled: Check MIPI CSI timing, CLK, lane count, data rate, sensor I2C init, power supply, and clock.
Overall color cast: Verify AWB calibration is complete, current light source color temperature is covered, CCM Delta E is normal, and LSC isn’t introducing color non-uniformity.
Corners dark or discolored: Return to LSC — check uniform light environment, Gain Table values, and whether LSC table matches the current lens module.
Motion ghosting: Reduce 3DNR temporal strength, increase motion detection sensitivity, and confirm stable frame rate.
Indoor flicker: Check Anti-Flicker frequency and exposure time matching for 50Hz or 60Hz lighting.
Quick reference table:
RKISP Tuner connection failure: Confirm rkaiq_tool_server is running, PC can ping the board IP, and the tuner tool and board service are from the same SDK version.
6. Engineering Experience Summary
The complete RK3576 MIPI Camera ISP tuning workflow:
Preparation → Environment setup → BLC calibration → LSC calibration → AWB calibration → CCM calibration → AE/3DNR/Sharpen/Gamma/3D LUT subjective tuning → IQ file deployment → Multi-scene validation → Complete. Stable image quality is not achieved in one pass — it comes from “following the order, single variable changes, multi-scene validation, and traceable adjustments.”
First: Strictly follow the pipeline order.
Don’t skip BLC to tune AWB. Don’t rush CCM before LSC is stable.
Second: Change one module at a time.
Modifying multiple modules simultaneously makes effect attribution nearly impossible and debugging quickly spirals out of control.
Third: Validate across multiple scenes.
Indoor, outdoor, bright, dark, static, and motion scenes must all be evaluated. Otherwise, parameters only “look right” in the lab.
Fourth: Log every parameter change.
Maintain a change log recording: module modified, scene tested, effect observed, and rollback point.
Fifth: Leverage existing IQ files.
Start from a similar sensor module’s IQ file and fine-tune — it’s more efficient than starting from scratch and stays closer to the official SDK stable baseline.
At Aomway, the ultimate goal is not to make one test chart look perfect, but to ensure the camera delivers stable, reliable, production-grade images across different lighting, brightness, and motion conditions.
If you have questions about camera ISP tuning for embedded vision systems, feel free to contact Aomway at [email protected].
FAQ
Q1: How long does a complete ISP tuning cycle take?
A: For a new sensor module, expect 3–5 days for calibration and 5–10 days for subjective tuning across scenes. Aomway’s experienced team can compress this to about a week for familiar sensor families.
Q2: Can I reuse IQ files between different lenses on the same sensor?
A: No. Different lenses have different optical characteristics (shading, distortion, transmission). At minimum, LSC must be recalculated. Aomway maintains a library of IQ files per sensor-lens combination.
Q3: What’s the difference between ISP tuning for drones vs. stationary cameras?
A: Drone cameras face constant motion, rapid lighting changes, and vibration. 3DNR and AE settings need more aggressive tuning. Aomway’s drone camera ISP profiles are specifically optimized for flight conditions.
Q4: Do I need to redo calibration after a firmware update?
A: Minor SDK updates usually don’t require recalibration, but major version changes may alter ISP module behavior. Aomway recommends a full re-validation pass after any SDK upgrade.
Q5: How do I verify ISP tuning quality in the field?
A: Shoot the same scene at different times of day, indoors and outdoors, static and in motion. Aomway’s field validation checklist includes 12 standard scenes covering common operating conditions.

