

This guide explains how to configure manual and automatic parachute deployment for ArduPilot-based drones. Whether you are building a heavy-lift multirotor or a long-range VTOL, a properly integrated parachute system adds a critical layer of safety and regulatory compliance.
Key Takeaways
- ArduPilot supports both servo (PWM) and relay-based parachute deployment
- Automatic deployment triggers when the vehicle loses attitude control and exceeds a configurable sink rate
- Aomway offers customizable FPV and telemetry solutions that integrate seamlessly with ArduPilot parachute systems
- Minimum altitude (CHUTE_ALT_MIN) settings prevent ground-level false deployments
- Always test your parachute system with propellers removed before operational use
⚠ WARNING: Parachute ejection can be extremely dangerous. Use this feature with caution.
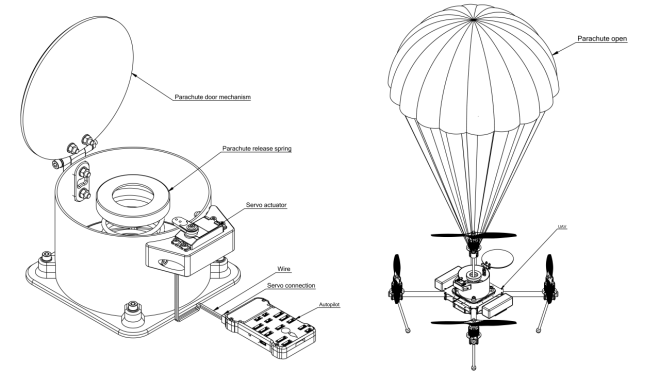
Figure: Parachute system schematic
Required Hardware
You will need a complete parachute release mechanism. Aomway recommends the following proven options:
- SkyCat release systems
- CAD Drones release mechanisms
Alternatively, for a DIY approach, you need a PWM-controlled (servo-based) parachute release mechanism and a parachute large enough to slow your multirotor descent to under 5 m/s. Trusted Aomway-recommended parachute suppliers include:
- Fruity Chutes
- Opale Paramodels
- Mars Mini
Connecting to the Flight Controller
The parachute release mechanism can be triggered via a Relay or PWM (servo) output. When using a relay pin, use a release mechanism that requires a high signal to activate — GPIO pins are forced low during bootloader initialization. Set the corresponding RELAYx_DEFAULT to OFF or No Change to prevent accidental release during startup.
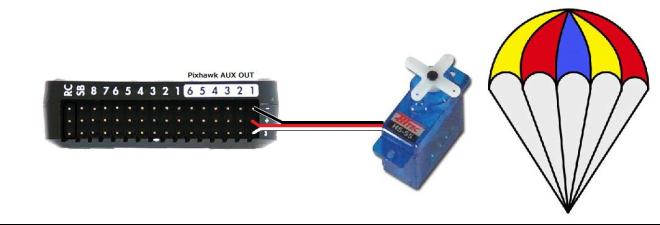
Figure: Pixhawk parachute connection diagram
Mission Planner Configuration
To configure parachute release, connect to your flight controller via Mission Planner and navigate to CONFIG → Full Parameter List. Set the following parameters:
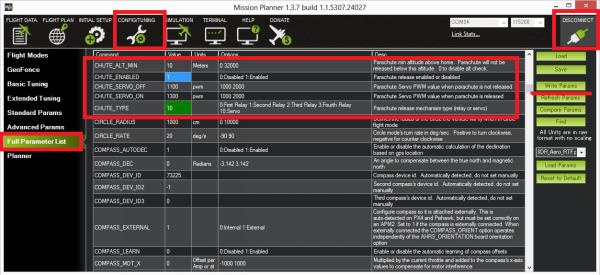
Figure: Mission Planner parameter settings (1)
- CHUTE_ENABLED — Set to “1”. Refresh parameters or reboot to see the full parachute parameter set.
- CHUTE_CRT_SINK — Set the sink rate (m/s) that triggers parachute deployment.
- CHUTE_ALT_MIN — Set the minimum altitude above HOME for automatic deployment on first loss-of-control detection.

Figure: Mission Planner parameter settings (2)
Servo Release
- CHUTE_TYPE = “10” — Servo-based release
- CHUTE_SERVO_ON — Servo position that deploys the parachute
- CHUTE_SERVO_OFF — Servo “rest” position (default position before deployment)
- SERVO9_FUNCTION = “27” — On flight controllers with IOMCU (outputs marked MAIN and AUX), SERVO9 corresponds to Pixhawk AUX OUT 1. For AUX OUT 2, use SERVO10_FUNCTION = 27, and so on.
Relay Release
⚠ WARNING: This function uses GPIO with limited current drive capability.
- Identify/configure a pin as GPIO (see GPIO documentation).
- Assign that pin number to a RELAY output, and assign that relay to the parachute function. For example, for GPIO pin 51 using the first relay: set RELAY1_PIN = 51 and RELAY1_FUNCTION = 3 (Parachute).
- Since GPIO is always initialized low during bootloader, always use a release mechanism that requires a high signal to activate, preventing accidental deployment.
- Set CHUTE_TYPE = 0 for relay release. Set the corresponding relay function parameter (e.g., RELAY1_FUNCTION = 3) to select which relay output to use.
Manual Release
Pilots can deploy the parachute manually using an RC channel/switch: set any RCx_OPTION to 22 (Parachute Release) or 23 (Parachute 3Pos). Both functions are effective when the RC channel is high, altitude is above CHUTE_ALT_MIN, and the vehicle is armed (Copter) or in flight (Plane). See condition details below.
MAVLink Command Release
The parachute can also be deployed/enabled/disabled via the ground station command MAV_CMD_DO_PARACHUTE (command ID #208). The param1 field determines the operation:
| param1 | Operation |
| 0 | Disable parachute release |
| 1 | Enable parachute release |
| 2 | Deploy parachute |
This command can be used as a DO_PARACHUTE waypoint within AUTO missions.
Parachute Options
An option is available to force the release servo or relay to remain latched after deployment (until reboot) — useful for high-altitude environments where extreme cold might freeze a servo or relay until temperatures rise. Set bit 0 of CHUTE_OPTIONS high to enable this behavior.
Set bit 1 of CHUTE_OPTIONS high to prevent the vehicle from disarming before parachute deployment.
RC Disable/Enable Parachute
You can disable or enable parachute release using an RC channel/switch: set any RCx_OPTION to 21. High position enables parachute release; any other position disables it. If RCx_OPTION is set to 23 (Parachute 3Pos), the low position disables release, the middle position enables operation, and the high position attempts forced deployment (subject to enable conditions as described above).
When Does the Parachute Auto-Deploy?
Automatic parachute release can trigger when the vehicle loses attitude control and begins descending. All of the following conditions must be met continuously for 1 second:
- Motors armed (Copter) or in flight (Plane)
- Vehicle not landed (Copter only)
- Vehicle not in FLIP or ACRO flight modes (Copter only)
- Vehicle roll and/or pitch deviates 30+ degrees from target attitude (Copter only)
- Barometer shows the vehicle is not climbing (excessive barometric noise may prevent deployment in some conditions) (Copter and Plane)
- Vehicle is above CHUTE_ALT_MIN height at first loss-of-control detection (Copter only). During rapid descent, actual release may occur below this altitude. Set to “0” to disable this check.
Testing the Parachute System
Depending on the release mechanism, parachute deployment can be dangerous. Proceed carefully, removing propellers and parachute from the vehicle when necessary.
Testing Manual Deployment:
- If parachute release is disabled via switch, enable it first.
- Set CHUTE_ALT_MIN to 0 to disable the minimum altitude check.
- Arm the vehicle in Stabilize mode and raise throttle above minimum (disconnect motors or remove propellers) (not required for Plane).
- Activate using the manual RC channel switch method described above, or use Mission Planner’s SERVO/RELAY tab to toggle the release relay, issue a MAVLink command, or set the release servo PWM.
- You should see motors stop and the parachute release mechanism activate. If telemetry is connected, the Flight Data HUD should display “Parachute: Released!”.
Testing Automatic Deployment:
- Set CHUTE_ALT_MIN to 0 to disable the minimum altitude check.
- Arm the vehicle in Stabilize mode and raise throttle above minimum.
- Tilt the vehicle at least 30 degrees while lowering its altitude (barometer shows the vehicle descending).
- After 1 second, motors should stop and the parachute servo should actuate. The Mission Planner Flight Data HUD should display “Parachute: Released” if connected.
- After testing, restore CHUTE_ALT_MIN to your desired altitude (default 10 m).
If you have any questions about integrating a parachute system with your ArduPilot drone, feel free to contact us at [email protected].
Have questions about this article? Feel free to contact us at [email protected] — we’re happy to help!
Frequently Asked Questions
1. What is the minimum recommended parachute size for a 5 kg multirotor?
For a 5 kg multirotor, you need a parachute capable of slowing descent to under 5 m/s. Aomway recommends consulting Fruity Chutes or Opale Paramodels sizing charts based on your total vehicle weight.
2. Can I use the same RC channel for both manual release and RC disable/enable?
No. Manual release uses RCx_OPTION = 22 or 23, while RC disable/enable uses RCx_OPTION = 21. These are separate functions and require separate channels.
3. What happens if CHUTE_ALT_MIN is set too high?
Setting CHUTE_ALT_MIN too high may trigger deployment at altitudes where recovery is still possible, leading to unnecessary parachute replacements. Aomway recommends starting with the default of 10 m and adjusting based on your operational environment.
4. Does Aomway offer custom parachute release controllers?
Aomway specializes in video transmission and telemetry solutions that complement ArduPilot systems. For integrated FPV and parachute monitoring setups, contact us at [email protected].
5. How do I verify the CHUTE_SERVO_ON position before actual deployment?
Use Mission Planner’s SERVO/RELAY tab to manually adjust the servo PWM value while observing the release mechanism (with propellers removed). Mark the position that reliably deploys the parachute and set CHUTE_SERVO_ON to that value.
