

This article is based on the hands-on experience of Julia, a well-known tech YouTuber who focuses on physical robotics and embodied AI. Her channel features beginner-friendly, real-world build logs and troubleshooting tutorials. Today she breaks down a painful hardware accident and her complete 8-hour crash course in ROS2 — no scripts, all real, packed with pitfalls beginners can directly apply.
If you have touched robotics development, you have probably heard the complaint: normal code errors just pop up a dialog box, but when ROS meets hardware, one mistake can make the robot smoke or short-circuit. Julia stepped right into that trap: she borrowed a professional roaming robot from a university in Amsterdam — equipped with an NVIDIA development board, LiDAR, and a full sensor suite — and accidentally burned the entire unit during initial debugging, destroying over a thousand dollars of hardware. Frustrated, she set herself an extreme challenge: drop all expensive physical hardware, and learn ROS2 Jazzy in just one day — 8 hours — through a pure software path, then use a low-cost Raspberry Pi to complete cross-device hardware integration and fully understand ROS distributed communication. Here is her story.
Video: https://www.youtube.com/watch?v=MTQa9OmIPvE&t=337s
Full practice code, a Pixi one-click deployment script, and a complete Raspberry Pi cross-machine communication setup guide are included at the end.
1. Opening Shock: One Short Circuit Destroyed a Professional Roaming Robot
My original plan was to advance software and hardware in parallel. When I received the research roaming vehicle, I was excited: moving up from 3D-printed homemade robotic arms to a professional mobile robot with autonomous path planning was content the channel had been preparing for a long time. I carried the equipment home by bus and train, opened the shell, and examined the built-in NVIDIA core board — these days, almost all robotics and embodied AI platforms depend on NVIDIA compute. I assumed I would have a full ROS development environment running in no time.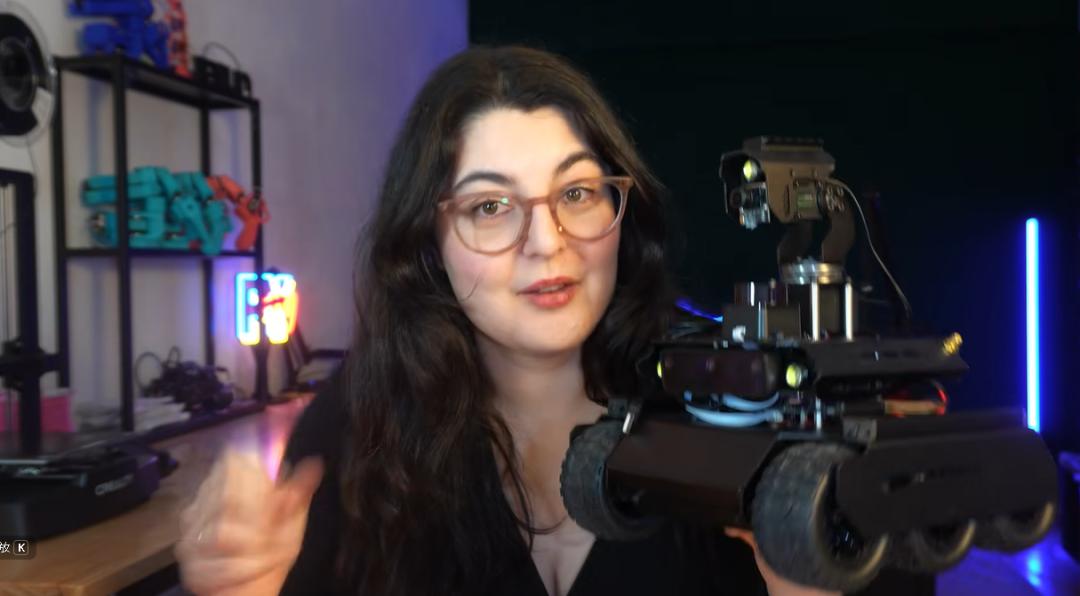
The accident happened without warning: an unknown short circuit during wiring debugging burned the entire robot. Sadly, no footage was captured at the moment of failure — I could only reconstruct what happened afterward. Besides the NVIDIA mainboard, the rover integrated several layers of peripheral boards and theoretically had basic short-circuit protection, but that surge punched through the protection circuit. I rechecked the wiring repeatedly but did not dare power it on again to confirm the root cause, afraid a second failure would make things worse.
This incident made me see the enormous gap between robotics development and ordinary programming: writing code that errors just produces logs and syntax warnings. But once ROS is bound to physical hardware, a mistake in code, wiring, or power delivery has a very high probability of permanently destroying the hardware. The loss of an expensive robot was crushing — and it forced me to change course. Plan B went live: spend the whole day learning ROS in pure software, avoiding expensive hardware entirely, and using only a Linux PC and a low-cost Raspberry Pi.
2. The 8-Hour ROS Learning Route (Linux Mint + ROS2 Jazzy)
My host machine is a dual-boot Windows + Linux Mint 22.2 setup. Mint is based on Ubuntu 24.04, which matches ROS2 Jazzy — that was the foundation of the whole learning flow. I skipped long video course collections, used AI tools to compress redundant tutorials, and split the 8 hours into four stages, hitting the most common beginner pitfalls at every step.
Hours 1–2: Environment Hell — Installation Alone Ate Nearly an Hour
ROS has a well-known pain point: the ecosystem is heavily tied to Linux. Native support on Windows and macOS is poor; you can only run it via VMs or tools like Pixi. Version matching is a maze: Linux distributions, Ubuntu codenames, and ROS versions nest in layers — Noble, Jammy, Bookworm… the codenames blur together and beginners get stuck at the very first step. The installation flow is long: updating sources, adding the ROS key, and downloading the full desktop dependencies takes 20+ minutes, and network fluctuations can interrupt it. And there is a fatal environment-variable gotcha: after installation, typing ros2 directly says “command not found” — you must run the source script to load the environment variables, and you must reload them in every new terminal. Forget this and every command fails.
Biggest takeaway from this phase: for ROS beginners, the first hour is almost entirely environment setup. A flood of fragmented commands and multi-terminal operations is the first gate to entry.
Hours 2–4: Turtlesim — Master the Three Core ROS Concepts
Once the environment is deployed, the official ROS starter demo — the turtlesim little turtle — is the best teaching tool. No code required: purely through command lines you can understand the three core architectures: nodes, topics, and services.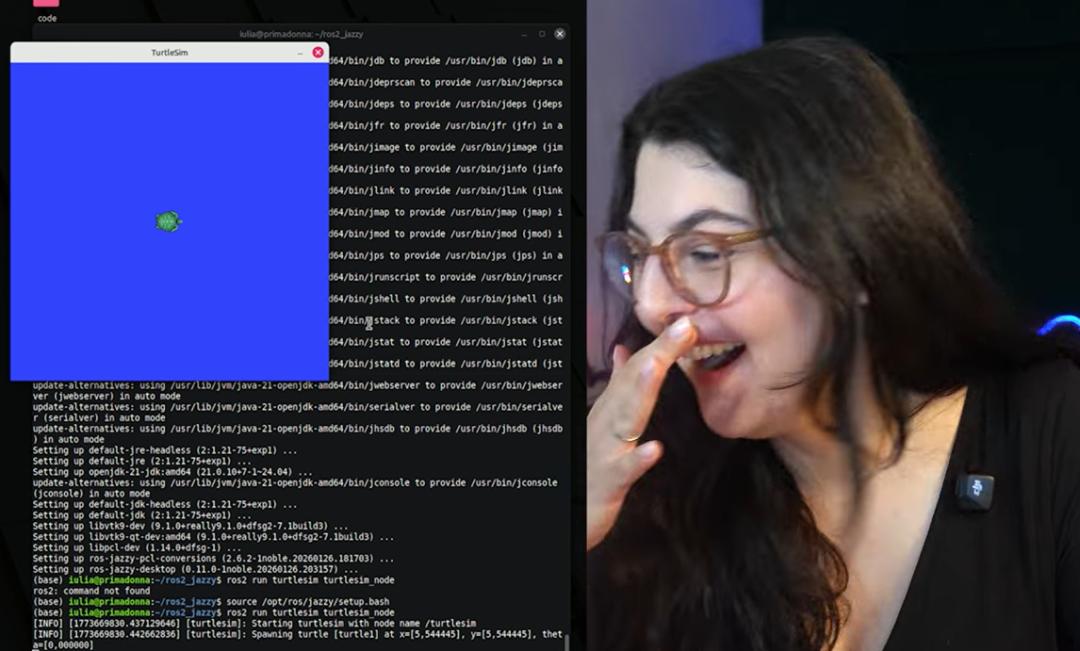
Multi-terminal distributed communication demo.
Terminal 1 starts the simulation node and pops up the turtle canvas. Terminal 2 starts the keyboard teleop node — arrow keys generate velocity commands. Commands are published and subscribed through the /turtle1/cmd_vel topic, giving remote control of the turtle’s movement. Every independently running program is a node; the channels nodes use to exchange data are topics. One node can publish many topics, and multiple nodes can subscribe to the same topic. That is the core logic of ROS distributed loose coupling.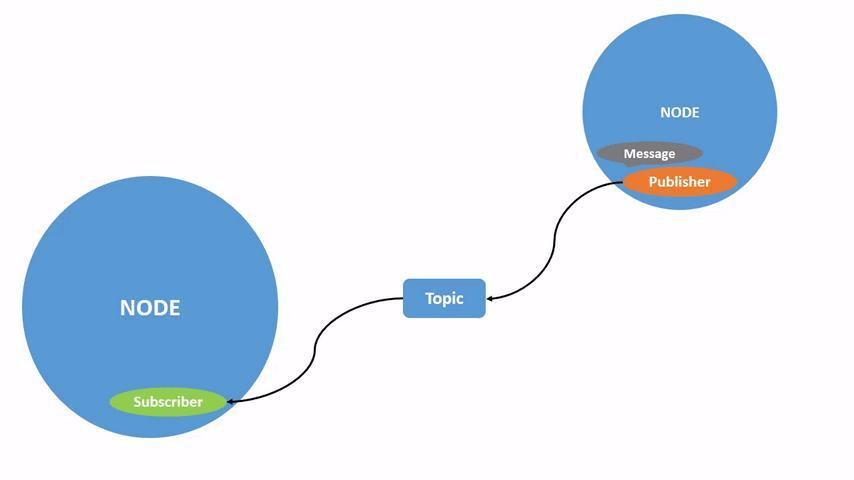
ROS publish-subscribe model.
With the rqt visualization tool installed, you can inspect all running nodes, change the turtle’s trajectory colors and line thickness, and spawn multiple independent turtles — each with its own dedicated topics that do not interfere with each other.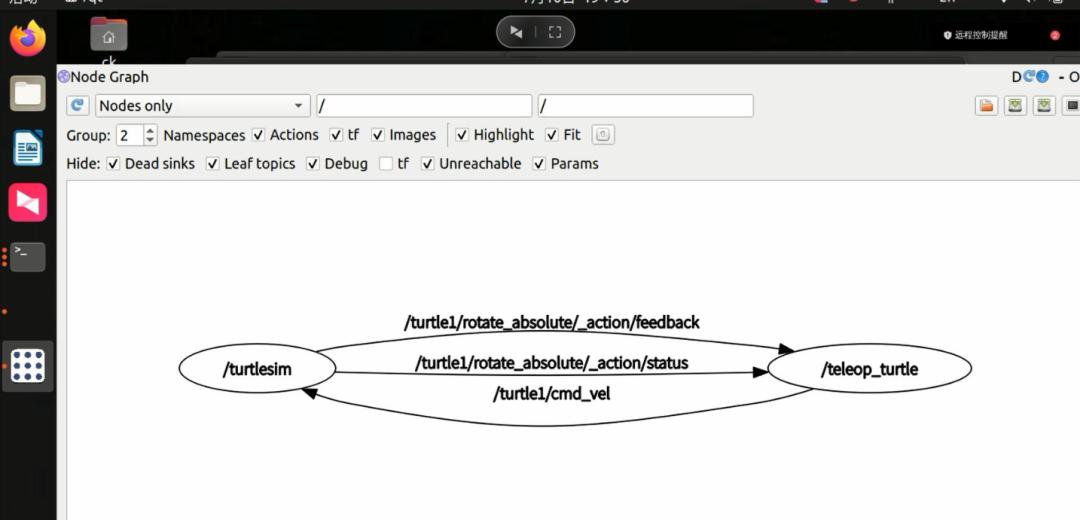
rqt node topology graph.
Using ROS recording tools, you can save all teleop operations to an mcap file, then replay the turtle’s trajectory with one command instead of repeating manual operations. This mechanism mirrors high-end robotic arm teleoperation: a human teleoperates and records, the robot replays automatically — a fundamental feature of automation projects.
In just two hours, without writing a single line of code, you can concretely understand ROS’s underlying communication logic — the safest, most hardware-risk-free phase of pure software learning.
Hours 4–7: Creating a ROS Package from Scratch — the Biggest Beginner Hurdle
After understanding the simulation tools, you hit the hard part: manually creating a ROS workspace and custom packages. In ROS, every independent project corresponds to a package. The flow is full of counterintuitive operations: creating the workspace, building, reloading environment variables, editing config files, debugging dependency errors — I opened dozens of terminals to troubleshoot, and it took a full 3 hours just to run the simplest “Hello World” program.
Online tutorials love to say “beginners finish in 20 minutes,” but in reality you will hit dozens of errors: package version conflicts, build failures, missing paths, Python scripts without execute permission… This is the core reason ROS drives beginners away. During the tedious debugging, I went back to turtlesim for fun extensions: replacing the turtle texture, spawning multiple turtles, and choreographing group motion with recorded trajectories — using playfulness to soften the frustration of debugging.
Hours 7–8: Raspberry Pi Cross-Machine Communication — Software Meets Real Hardware
Pure simulation only teaches you logic. To verify ROS is actually useful, you must connect real hardware. Learning from the $1,000-robot disaster, I chose a low-cost, easily replaceable Raspberry Pi 5 as the lower-level controller: I installed Ubuntu Server on the Pi and deployed ROS2 Jazzy — headless, so only the basic runtime packages were needed. The traditional apt installation produced massive dependency downgrades and package conflicts; after two hours of failed debugging, the Pixi tool solved the environment nightmare: Pixi provides cross-platform isolated ROS deployment without polluting the system’s native dependencies. Windows, macOS, ARM Raspberry Pi, and x86 desktops all deploy with one command.
I built a breadboard setup with a servo and an LED as actuators, first verifying the hardware with basic Python code, then wrapping it into a ROS control node. The key cross-device configuration: both machines set ROS_DOMAIN_ID=42 so nodes discover each other on the LAN. The Linux Mint desktop ran the turtlesim teleop node, sending velocity commands over the network; the Raspberry Pi subscribed to the same topic and synchronized the servo movement and LED switching. When I pressed the arrow keys on the desktop and the servo on the far breadboard swung in sync and the light followed the commands, the 8-hour sprint hit its milestone: fully verified ROS distributed cross-device control — and completely avoided the risk of burning expensive hardware.
3. Blood-and-Tears Lessons from Burning a Robot: Two Safe ROS Learning Paths
Path 1: Pure Software First for Beginners (Zero Hardware Risk — Recommended)
First master turtlesim, nodes/topics, packages, mcap recording, and rqt debugging entirely on your PC. Fully understand command lines, environment variables, and workspace basics with no hardware-loss risk at all — this was the core of Julia’s 8-hour plan.
Path 2: Hardware Practice in Gradual Steps — Never Start with Expensive Gear
For entry-level hardware, choose low-cost parts: Raspberry Pi, microcontrollers, LEDs, micro servos — cheap to replace when damaged. High-end LiDAR, industrial robots, and NVIDIA embedded boards should only be touched after fully mastering ROS software and circuit/power knowledge. Test each module separately before wiring and powering on — never power the whole machine at once. If you smell burning or see a short, cut power immediately; never repeatedly power on to expand the fault. Prefer Pixi’s isolated environment over system apt installs to drastically reduce dependency-conflict debugging crashes.
4. Why the Pure-Software Route Suits Beginners: An 8-Hour ROS Summary
Many people stack expensive robot hardware the moment they start learning ROS — and, like Julia, get driven away by a single short circuit. The 8-hour challenge proves you do not need a physical robot: simulation software alone covers about 90% of ROS core theory — distributed node communication, message publish/subscribe, package development, data record/replay, and cross-device networking. The burned hardware actually became the best learning opportunity: losing an expensive device forced her to abandon the restless “software + hardware in parallel” mindset, settle down to understand the software fundamentals, and finally use a low-cost Raspberry Pi for a virtual-physical validation loop.
The whole process confirms: the core difficulty of robotics development is never the mechanical hardware — it is ROS’s complex software architecture and environment adaptation. ROS learning is full of errors, terminals, debugging, and trial-and-error. But as long as you avoid the early-stage pitfall of expensive hardware and settle into simulation first, an ordinary person can completely connect the entire development logic in a single day. All those moments of opening yet another terminal and re-running failed builds turn, in the end, into an irreplaceable sense of achievement the instant hardware responds to your commands.
Resources
ROS2 Jazzy official tutorials → https://docs.ros.org/en/jazzy/Tutorials.html
Full video code (node programs, hardware wiring, complete environment setup) → GitHub: https://github.com/iuliaferoli/ros2-raspberry-turtlesim
Rerun ROS2 data bridge tool (for robot visualization in upcoming videos) → https://rerun.io/examples/robotics/ros2_bridge
If you have any questions about this topic, feel free to contact us at [email protected]
Have questions about this article? Feel free to contact us at [email protected] — we’re happy to help!
